Exploring large Datasets - Cats vs Dogs
This part of the week we the course focus more in the convolutional Network, using as example the cats and dogs Kaggle competition.
Dataset and file/directory structure
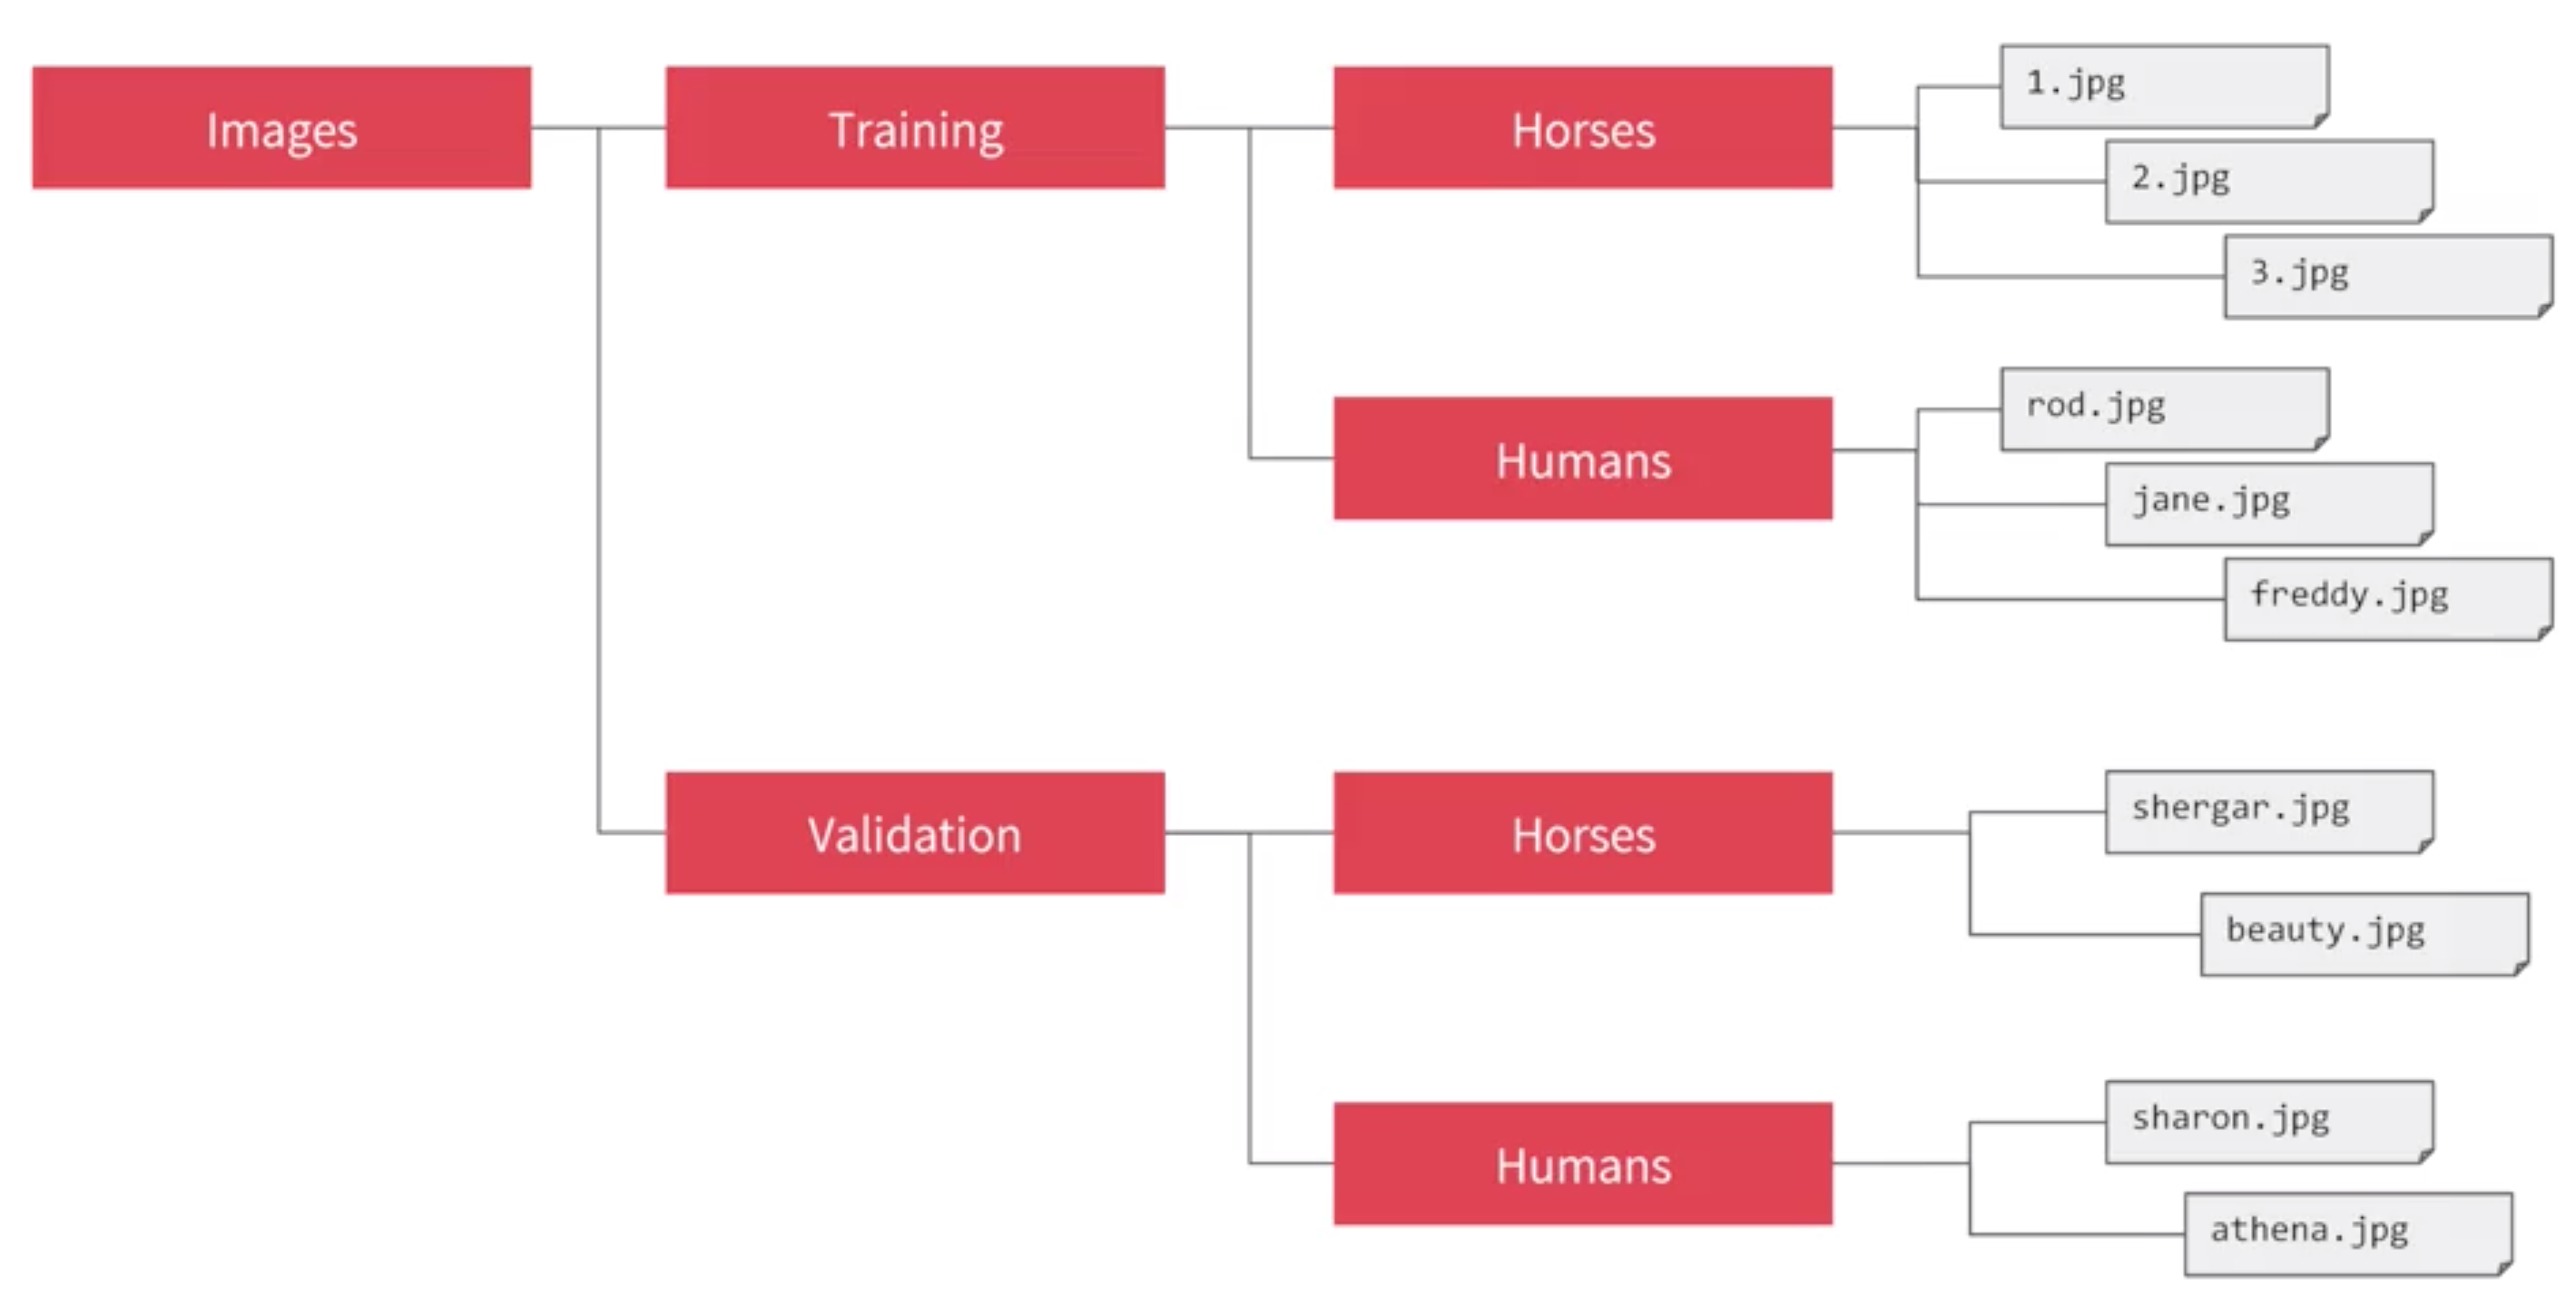
First we will need to organize the directory in such way that mimic the structure that we use in previous example
 But in this case we will do it with the cats and dogs dataset.
1. Download the dataset
First we need to download the dataset from kaggle ( casts vs dogs dataset)
This data set contain images of cats and dogs all in a single directory.
2. Reorganize the dataset in a specific directory structure
We want to re-organize the data to follow the structure:
| cats-v-dogs
|
--> Training
|
--->dogs
|
--->cats
|
--> Testing
|
--->dogs
|
--->cats
|
For that we will make use of the os library and the path.join() and os.mkdir() functions
Regarding the code
1. Libraries to import
We will need several libraries but for the first step we will need something to get the Dataset .zip file, something to create the path and directories and something to copy the files to the new directory
import os It will allow use to make directories and create the pathsimport zipfile allow use to handle .zip filesfrom shutil import copyfile allow use to copy files from one directory to other.
import random we will use it later to randomize the samples, so later we can divide the dataset in training and test in the random way.
| import os
import zipfile
import random
import tensorflow as tf
from tensorflow.keras.optimizers import RMSprop
from tensorflow.keras.preprocessing.image import ImageDataGenerator
from shutil import copyfile
|
ImageDataGenerator class just for re-scale the data but in the future we will use it to generate more data.
2. Handle the zipfile
THis is going to use code use on colab and jupyter notebooks, this might be different if we are using just an script and running it locally.
| !wget --no-check-certificate \
"https://download.microsoft.com/download/3/E/1/3E1C3F21-ECDB-4869-8368-6DEBA77B919F/kagglecatsanddogs_3367a.zip" \
-O "/tmp/cats-and-dogs.zip"
local_zip = '/tmp/cats-and-dogs.zip'
zip_ref = zipfile.ZipFile(local_zip, 'r')
zip_ref.extractall('/tmp')
zip_ref.close()
|
/tmp.
Checking the size of the directory
We can check the size of the directory using os.listdir('path')
| print(len(os.listdir('/tmp/PetImages/Cat/')))
print(len(os.listdir('/tmp/PetImages/Dog/')))
|
3. Creating the directory structure and moving files
The creation of directories is a task that might fail so it is a good practice to put it on a try/except block
First we will create the path to the directories we want to create, we will do that using os.path.join(parent_dir, child_dir)
| base_path = os.path.join('/tmp/','cats-v-dogs')
training_path = os.path.join(base_path,'/tmp/cats-v-dogs/training')
train_dog_path = os.path.join(training_path,'/tmp/cats-v-dogs/training/dogs')
train_cat_path = os.path.join(training_path,'/tmp/cats-v-dogs/training/cats')
testing_path = os.path.join(base_path,'/tmp/cats-v-dogs/testing')
test_dog_path = os.path.join(testing_path,'/tmp/cats-v-dogs/testing/dogs')
test_cat_path = os.path.join(testing_path,'/tmp/cats-v-dogs/testing/cats')
|
os.mkdir('path') to create the directories, all of this inside a try/except block.
| try:
os.mkdir(base_path)
os.mkdir(training_path)
os.mkdir(testing_path)
os.mkdir(train_dog_path)
os.mkdir(train_cat_path)
os.mkdir(test_dog_path)
os.mkdir(test_cat_path)
except OSError:
pass
|
4. Split the dataset in Training and Testing
Now, we need to create a dataset to be used as training data and other as testing, for that we can create a function, this case we will create function that will get as parameters: SOURCE, TRAINING, TESTING, SPLIT-SIZE. SOURCE been the original folder and the SPLIT_SIZE ratio to split the dataset.
| def split_data(SOURCE, TRAINING, TESTING, SPLIT_SIZE):
clean_list = [data for data in os.listdir(SOURCE) if os.path.getsize(SOURCE+data) ]
random_list = random.sample(clean_list, len(clean_list))
limit = int(len(random_list)*SPLIT_SIZE)
training_list = random_list[:limit]
testing_list = random_list[limit:]
for img in training_list:
copyfile(os.path.join(SOURCE,img), os.path.join(TRAINING,img))
for img in testing_list:
copyfile(os.path.join(SOURCE,img), os.path.join(TESTING,img))
|
- we get the full dataset, check remove those files that are corrupt or which size is
0 using os.path.getsize().
- later randomize the dataset with
random.sample().
- Create a limit based in what is the ratio split for the dataset (example: \(.9\) means \(90\%\) data goes for Training \(10\%\) for testing).
- Create 2 list one for training others for testing.
- Finally using
copyfile() we move the files from the source to the final destination.
Here is how it will look in the Notebook
| def split_data(SOURCE, TRAINING, TESTING, SPLIT_SIZE):
print(f' Source path {SOURCE},\n Training {TRAINING}')
clean_list = [data for data in os.listdir(SOURCE) if os.path.getsize(SOURCE+data) ]
random_list = random.sample(clean_list, len(clean_list))
limit = int(len(random_list)*SPLIT_SIZE)
print(f'total: {len(random_list)} after split {limit}')
training_list = random_list[:limit]
testing_list = random_list[limit:]
print(f'{len(training_list)}, {len(testing_list)}')
for img in training_list:
copyfile(os.path.join(SOURCE,img), os.path.join(TRAINING,img))
for img in testing_list:
copyfile(os.path.join(SOURCE,img), os.path.join(TESTING,img))
CAT_SOURCE_DIR = "/tmp/PetImages/Cat/"
TRAINING_CATS_DIR = "/tmp/cats-v-dogs/training/cats/"
TESTING_CATS_DIR = "/tmp/cats-v-dogs/testing/cats/"
DOG_SOURCE_DIR = "/tmp/PetImages/Dog/"
TRAINING_DOGS_DIR = "/tmp/cats-v-dogs/training/dogs/"
TESTING_DOGS_DIR = "/tmp/cats-v-dogs/testing/dogs/"
split_size = .9
split_data(CAT_SOURCE_DIR, TRAINING_CATS_DIR, TESTING_CATS_DIR, split_size)
split_data(DOG_SOURCE_DIR, TRAINING_DOGS_DIR, TESTING_DOGS_DIR, split_size)
|
5. The model
The architecture of the model
We are going to use 3 layers of convolution and 3 of pooling. The important details will be the first layer that contain the input_size() 150X150 size x3 because it is a color image so we need 3 channels (RGB). The last Layer will use a different activation function, in this case a sigmoid because the selection we are doing is binary (cat and dog) so sigmoid is the best option.
| model = tf.keras.models.Sequential([
tf.keras.layers.Conv2D(16,(3,3),activation='relu', input_shape=(150,150,3)),
tf.keras.layers.MaxPooling2D(2,2),
tf.keras.layers.Conv2D(32,(3,3), activation='relu'),
tf.keras.layers.MaxPooling2D(2,2),
tf.keras.layers.Conv2D(64,(3,3), activation='relu'),
tf.keras.layers.MaxPooling2D(2,2),
tf.keras.layers.Flatten(),
tf.keras.layers.Dense(512,activation='relu'),
tf.keras.layers.Dense(1,activation='sigmoid')
])
|
Now for the compilation we will use an optimizer RMSprop(lr=0,001) the learning rate will be lr=0.001, the loss function will be binary_crossentropy again because is a binary selection, and the metric will be accuracy.
| model.compile(optimizer=RMSprop(lr=0.001), loss='binary_crossentropy', metrics=['accuracy'])
|
Image Data Generator
In this case we wont use the different parameters of the class ImageDataGenerator we will use just the rescale parameter.
| train_datagen = ImageDataGenerator(rescale=1./255)
|
- Define the Training directory path.
- Create an instance of
ImageDataGenerator.
- Use
flow_from_directory to get the different pieces of data\
| batch_size = 10 # we need this later
#1. Training directory
TRAINING_DIR = "/tmp/cats-v-dogs/training"
#2. Instance of class ImageDataGEnerator
train_datagen = ImageDataGenerator(rescale=1./255)
#3. use `flow_from_directory` to process the files
train_generator = train_datagen.flow_from_directory(
directory=TRAINING_DIR,
target_size =(150,150),
batch_size=batch_size,
class_mode='binary' )
VALIDATION_DIR = '/tmp/cats-v-dogs/testing'
validation_datagen = ImageDataGenerator(rescale=1./255)
validation_generator = validation_datagen.flow_from_directory(
directory=VALIDATION_DIR,
target_size =(150,150),
batch_size=batch_size,
class_mode='binary' )
|
Training the model
We will use the ImageDataGEnerator create before to train the model
| history = model.fit(train_generator,
epochs=15,
verbose=1,
validation_data=validation_generator)
|
6. Plot the results
The following is copy form the coded provided in the coursera course, it is use to plot the results of the model, it will plot Loss and Accuracy
| # PLOT LOSS AND ACCURACY
%matplotlib inline
import matplotlib.image as mpimg
import matplotlib.pyplot as plt
#-----------------------------------------------------------
# Retrieve a list of list results on training and test data
# sets for each training epoch
#-----------------------------------------------------------
acc=history.history['accuracy']
val_acc=history.history['val_accuracy']
loss=history.history['loss']
val_loss=history.history['val_loss']
epochs=range(len(acc)) # Get number of epochs
#------------------------------------------------
# Plot training and validation accuracy per epoch
#------------------------------------------------
plt.plot(epochs, acc, 'r', "Training Accuracy")
plt.plot(epochs, val_acc, 'b', "Validation Accuracy")
plt.title('Training and validation accuracy')
plt.figure()
#------------------------------------------------
# Plot training and validation loss per epoch
#------------------------------------------------
plt.plot(epochs, loss, 'r', "Training Loss")
plt.plot(epochs, val_loss, 'b', "Validation Loss")
plt.title('Training and validation loss')
# Desired output. Charts with training and validation metrics. No crash :)
|