Augmentation
In cases were the data is not enough or cases where we have a dataset and we start to see overfitting, augmentation can be a solution for the problem.
For data augmentation we will use the class ImageDataGenerator and the different parameters, in this nodes I will add the code and graphics that help me to understand and visualize the benefits of augmentation.
The model without Augmentation
The model without augmentation will be like the one we did in the previous note
The model (code)
| !wget --no-check-certificate \
https://storage.googleapis.com/mledu-datasets/cats_and_dogs_filtered.zip \
-O /tmp/cats_and_dogs_filtered.zip
import os
import zipfile
import tensorflow as tf
from tensorflow.keras.optimizers import RMSprop
from tensorflow.keras.preprocessing.image import ImageDataGenerator
local_zip = '/tmp/cats_and_dogs_filtered.zip'
zip_ref = zipfile.ZipFile(local_zip, 'r')
zip_ref.extractall('/tmp')
zip_ref.close()
base_dir = '/tmp/cats_and_dogs_filtered'
train_dir = os.path.join(base_dir, 'train')
validation_dir = os.path.join(base_dir, 'validation')
# Directory with our training cat pictures
train_cats_dir = os.path.join(train_dir, 'cats')
# Directory with our training dog pictures
train_dogs_dir = os.path.join(train_dir, 'dogs')
# Directory with our validation cat pictures
validation_cats_dir = os.path.join(validation_dir, 'cats')
# Directory with our validation dog pictures
validation_dogs_dir = os.path.join(validation_dir, 'dogs')
model = tf.keras.models.Sequential([
tf.keras.layers.Conv2D(32, (3,3), activation='relu', input_shape=(150, 150, 3)),
tf.keras.layers.MaxPooling2D(2, 2),
tf.keras.layers.Conv2D(64, (3,3), activation='relu'),
tf.keras.layers.MaxPooling2D(2,2),
tf.keras.layers.Conv2D(128, (3,3), activation='relu'),
tf.keras.layers.MaxPooling2D(2,2),
tf.keras.layers.Conv2D(128, (3,3), activation='relu'),
tf.keras.layers.MaxPooling2D(2,2),
tf.keras.layers.Flatten(),
tf.keras.layers.Dense(512, activation='relu'),
tf.keras.layers.Dense(1, activation='sigmoid')
])
model.compile(loss='binary_crossentropy',
optimizer=RMSprop(lr=1e-4),
metrics=['accuracy'])
# All images will be rescaled by 1./255
train_datagen = ImageDataGenerator(rescale=1./255)
test_datagen = ImageDataGenerator(rescale=1./255)
# Flow training images in batches of 20 using train_datagen generator
train_generator = train_datagen.flow_from_directory(
train_dir, # This is the source directory for training images
target_size=(150, 150), # All images will be resized to 150x150
batch_size=20,
# Since we use binary_crossentropy loss, we need binary labels
class_mode='binary')
# Flow validation images in batches of 20 using test_datagen generator
validation_generator = test_datagen.flow_from_directory(
validation_dir,
target_size=(150, 150),
batch_size=20,
class_mode='binary')
history = model.fit(
train_generator,
steps_per_epoch=100, # 2000 images = batch_size * steps
epochs=100,
validation_data=validation_generator,
validation_steps=50, # 1000 images = batch_size * steps
verbose=2)
|
In this case we use the class ImageDataGenerator just to rescale the data.
The model in graphics
In the image bellow we can see that the accuracy of the training is \(100\%\) but in the validation set the accuracy is not bigger than \(75\%\).

now if we plot the results we will see some interesting points
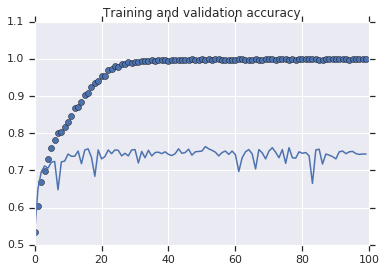
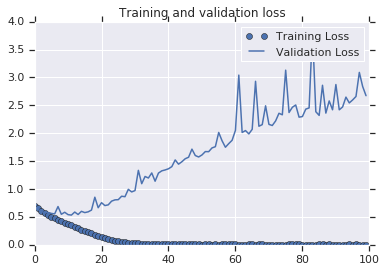
Although the Training loss is \(0\), the validation loss is increasing, the accuracy on the training is \(100\%\) but in the validation stop at around \(70\%\), this is a clear indication that the model is suffering of over-fitting in other words it memorize the training data but is not able to generalize and perform well with data that haven't seen before.
The Augmentation
To do the augmentation we will use some of the classes we use before, in this case we will use the class ImageDataGenerator previously we use it for rescale but in this case we will use some of the parameter to make the augmentation.
From the documentation we now that the class ImageDataGEnerator is as follow:
| tf.keras.preprocessing.image.ImageDataGenerator(
featurewise_center=False,
samplewise_center=False,
featurewise_std_normalization=False,
samplewise_std_normalization=False,
zca_whitening=False,
zca_epsilon=1e-06,
rotation_range=0,
width_shift_range=0.0,
height_shift_range=0.0,
brightness_range=None,
shear_range=0.0,
zoom_range=0.0,
channel_shift_range=0.0,
fill_mode='nearest',
cval=0.0,
horizontal_flip=False,
vertical_flip=False,
rescale=None,
preprocessing_function=None,
data_format=None,
validation_split=0.0,
dtype=None
)
|
Although we are going to use just few of them
rescalerotation_rangewidth_shift_rangeheight_shift_rangeshear_rangezoom_rangehorizontal_flipfill_mode
rotation_range
This parameter will rotate the image from 0~180 degrees randomly, so if we do rotation_range=40 the image will be rotated randomly from 0 to 40 degrees.
width_shift_range and height_shift_range
This will shift the subject within the frame, the value will be a proportion of the total size .
shear_range
this will skew the image along the x-axis, this will help us to simulate different position of the subject.
zoom_range
In will zoom Randomly a having as limit the value we pass to the parameter
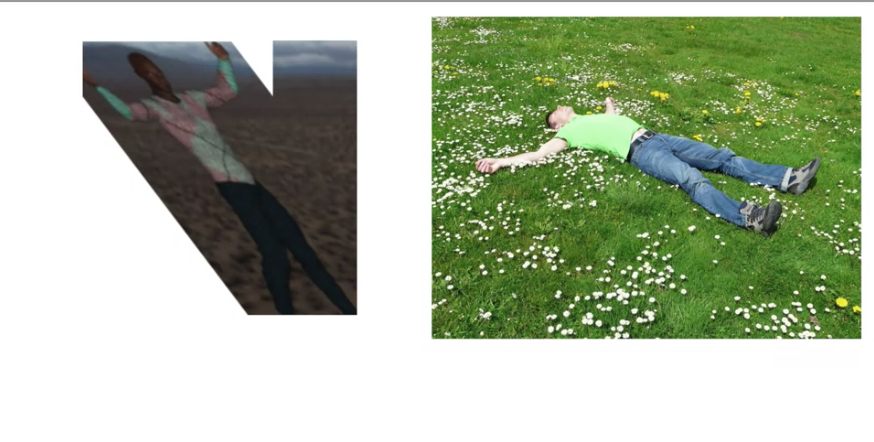
horizontal_flip
It will flip the sample horizontally, it is a good way to generate data of different position, let say we have a picture with a person raising the left arm, if we flip it horizontally we will have a picture of a person raising the right arm.
fill_mode
fill the empty space left after the transformation, the default option is nearest but there are option like 'constant", "nearest", "reflect" or "wrap".
A model with the Augmentation
Now we will add the augmentation to the previous model, as we mention the augmentation will be in the class ImageDataGenerator
The Augmentation (code)
| train_datagen = ImageDataGenerator(
rescale=1./255,
rotation_range=40,
width_shift_range=0.2,
height_shift_range=0.2,
shear_range=0.2,
zoom_range=0.2,
horizontal_flip=True,
fill_mode='nearest')
|
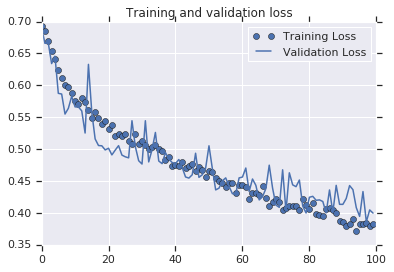
The model with Augmentation
and now the full model will be:
| !wget --no-check-certificate \
https://storage.googleapis.com/mledu-datasets/cats_and_dogs_filtered.zip \
-O /tmp/cats_and_dogs_filtered.zip
import os
import zipfile
import tensorflow as tf
from tensorflow.keras.optimizers import RMSprop
from tensorflow.keras.preprocessing.image import ImageDataGenerator
local_zip = '/tmp/cats_and_dogs_filtered.zip'
zip_ref = zipfile.ZipFile(local_zip, 'r')
zip_ref.extractall('/tmp')
zip_ref.close()
base_dir = '/tmp/cats_and_dogs_filtered'
train_dir = os.path.join(base_dir, 'train')
validation_dir = os.path.join(base_dir, 'validation')
# Directory with our training cat pictures
train_cats_dir = os.path.join(train_dir, 'cats')
# Directory with our training dog pictures
train_dogs_dir = os.path.join(train_dir, 'dogs')
# Directory with our validation cat pictures
validation_cats_dir = os.path.join(validation_dir, 'cats')
# Directory with our validation dog pictures
validation_dogs_dir = os.path.join(validation_dir, 'dogs')
model = tf.keras.models.Sequential([
tf.keras.layers.Conv2D(32, (3,3), activation='relu', input_shape=(150, 150, 3)),
tf.keras.layers.MaxPooling2D(2, 2),
tf.keras.layers.Conv2D(64, (3,3), activation='relu'),
tf.keras.layers.MaxPooling2D(2,2),
tf.keras.layers.Conv2D(128, (3,3), activation='relu'),
tf.keras.layers.MaxPooling2D(2,2),
tf.keras.layers.Conv2D(128, (3,3), activation='relu'),
tf.keras.layers.MaxPooling2D(2,2),
tf.keras.layers.Dropout(0.5),
tf.keras.layers.Flatten(),
tf.keras.layers.Dense(512, activation='relu'),
tf.keras.layers.Dense(1, activation='sigmoid')
])
model.compile(loss='binary_crossentropy',
optimizer=RMSprop(lr=1e-4),
metrics=['accuracy'])
# This code has changed. Now instead of the ImageGenerator just rescaling
# the image, we also rotate and do other operations
# Updated to do image augmentation
train_datagen = ImageDataGenerator(
      rescale=1./255,
      rotation_range=40,
      width_shift_range=0.2,
      height_shift_range=0.2,
      shear_range=0.2,
      zoom_range=0.2,
      horizontal_flip=True,
      fill_mode='nearest')
test_datagen = ImageDataGenerator(rescale=1./255)
# Flow training images in batches of 20 using train_datagen generator
train_generator = train_datagen.flow_from_directory(
train_dir, # This is the source directory for training images
target_size=(150, 150), # All images will be resized to 150x150
batch_size=20,
# Since we use binary_crossentropy loss, we need binary labels
class_mode='binary')
# Flow validation images in batches of 20 using test_datagen generator
validation_generator = test_datagen.flow_from_directory(
validation_dir,
target_size=(150, 150),
batch_size=20,
class_mode='binary')
history = model.fit(
train_generator,
steps_per_epoch=100, # 2000 images = batch_size * steps
epochs=100,
validation_data=validation_generator,
validation_steps=50, # 1000 images = batch_size * steps
verbose=2)
|

The code use to make the graphics
| import matplotlib.pyplot as plt
acc = history.history['accuracy']
val_acc = history.history['val_accuracy']
loss = history.history['loss']
val_loss = history.history['val_loss']
epochs = range(len(acc))
plt.plot(epochs, acc, 'bo', label='Training accuracy')
plt.plot(epochs, val_acc, 'b', label='Validation accuracy')
plt.title('Training and validation accuracy')
plt.figure()
plt.plot(epochs, loss, 'bo', label='Training Loss')
plt.plot(epochs, val_loss, 'b', label='Validation Loss')
plt.title('Training and validation loss')
plt.legend()
plt.show()
|